Description
Just keep in mind - crucial for a perfect result: don’t be afraid of sticky dough. Don’t skimp with the kneading. Don’t overbake it.
Don’t be put off neither by the long list of ingredients for the filling (they make for a well-rounded flavour) nor by the braiding process, it took me numerous bakes to reach the state where it looks neat and even.
Ingredients
Dough:
200 ml milk
425 g all-purpose flour (plus additional as needed )
20 g fresh yeast
75 g butter
50 g sugar
1/2 tsp fine sea salt
1 egg (M)
Filling:
100 g ground almonds
100 g ground hazelnuts
1,5 tsp Ceylon cinnamon
1/8 tsp ground cloves
1/8 tsp freshly grated nutmeg
100 ml milk
25 g butter
50 g marzipan
50 g brown sugar (Demerara or light Muscovado)
1/4 tsp fine sea salt
1-2 tbsp honey
1 tbsp Rum
1 tbsp Amaretto
1 organic lemon
For the glaze:
1 egg (M)
2 tbsp milk
30 g sliced hazelnuts or almonds
3-4 tbsp apricot jam
1-2 tbsp water
Directions
1.Prepare the dough:
Heat the milk in a small pot until lukewarm, then remove from stove. Sieve flour into a bowl and make a depression in the middle. Crumble the fresh yeast into the center and pour about 1/3 of the milk over it. Cover bowl with a kitchen towel and let the pre-dough rise for about 15 minutes, until slightly bubbly. Cut the butter into cubes, add it to the rest of the milk and heat just until melted, then remove from heat.
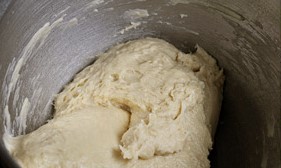
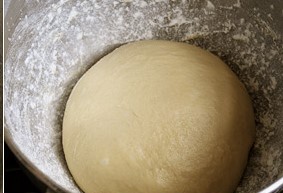
Add the remaining dough ingredients and beat well (I use a KitchenAid with dough hook on 4). This dough will be very sticky and NOT clean the sides of the bowl by itself, but 5 to 7 minutes of kneading will improve the texture a bit (if you are afraid of sticky yeast doughs, you can add 1 or 2 tablespoons of additional flour within the first minutes). Scrap it onto a well-floured work surface, shape it – with floured hands – into a ball and put back into the floured bowl. Cover bowl with a kitchen towel and let the dough rise in a warm spot for 1 hour or until doubled.
2. Prepare the filling:
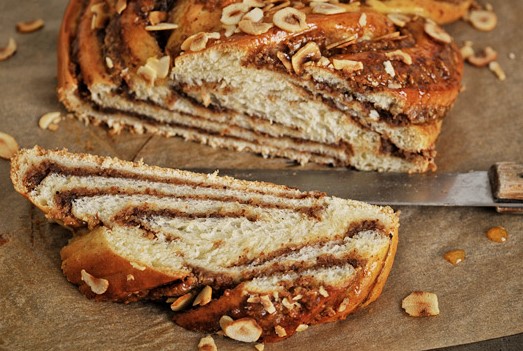
Start by roasting the nuts together with cinnamon, cloves and nutmeg in a wide pan until golden and fragrant (don’t be tempted to do anything else at the same time, nuts burn fast, turn them constantly!). Next heat the milk, butter, chopped marzipan, brown sugar and salt in a small saucepan and stir until marzipan and sugar have dissolved, then remove from heat and add honey, liqueurs and finely grated zest of half a lemon. Pour over the nuts, combine with a spoon until a smooth paste forms and let cool for 5 to 10 minutes before spreading it onto the dough (it thickens as it cools). Waiting longer will result in a rather dense paste, that is hard to spread (emergency rescue: add a little milk).
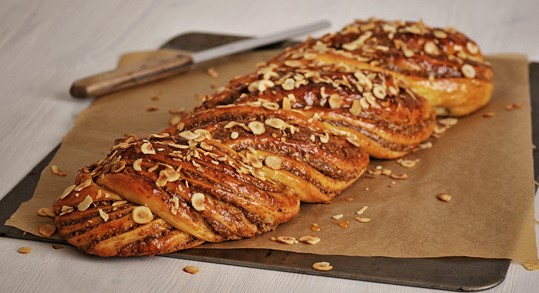
3. Shape it:
Line a baking sheet with parchment paper. Beat egg and milk in a small bowl and set aside. Scrap the risen dough onto a well-floured work surface, use your hands to press and pull it into rectangular shape, then roll it out with a rolling pin (~35 x 35 cm, ~14 x 14 in), dusting with flour when necessary. Gently and evenly spread the nut paste onto the dough, leaving a 2 cm edge all around. Roll up and carefully transfer to the baking sheet.
Now on to the more delicate part! Cut the roll in half with a large knife, but be sure to leave the top 5 cm/2 in intact. Key is it to braid the two strands not only around each other, but to always place the cut side upwards. As always, the more often you bake this recipe, the neater the results will turn out! Lastly tuck both ends under, this helps to give it a clean and plump look. Brush it generously with the egg milk, start with the dough parts, then the filling. Now preheat the oven to 180°C while the braid gets its final rise (20 to 30 minutes).
Bake and finish:
Bake on middle level for 30 to 34 min. Meanwhile prepare the nuts and glaze: Mix the apricot jam (press through sieve first, if chunky) and 1-2 tbsp of water in a small pot and heat shortly until smooth and runny. Roast the nuts in a pan until golden. Remove the braid from the oven and generously brush with the apricot glaze. Sprinkle with the roasted nuts and let cool until cutting the first slice. Tastes great the next day, the day after that and even three days later (well covered).


Comments